Iris Information
Varieties Of Bearded Iris
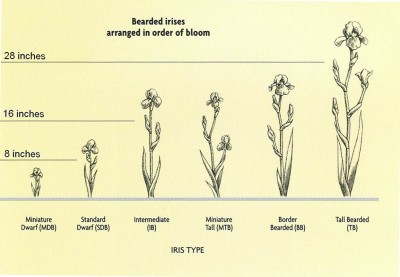
Miniature Dwarf Bearded
These are the tiniest of bearded iris, growing up to 8 inches in height. They are the earliest of the bearded iris to bloom, and are ideal for rock gardens and fronts of borders.
Standard Dwarf Bearded
Ranging in height from 9 to 15 inches, these are some of the most versatile garden plants. Blooming just after the miniature dwarf bearded irises in the early spring, they are excellent for edgings and the fronts of borders.
Intermediate Bearded
Blooming after the dwarfs and reaching in height form 16 to 28 inches, these cheerful irises will brighten your garden and mix well with other favorite spring bloomers.
Tall Bearded
These are the gorgeous queens of the iris world, with magnificent 6 inch blooms displayed on stems over 29 inches high. They are available in every color of the spectrum and include an incredible variety of color patterns and combinations.
Remontants or Reblooming Irises
Remontants are bearded irises that bloom in the spring and in the fall. In order to generate enough energy for a good fall bloom, remontants require more moisture in the summer months. They do well mulched and need an extra fertilizer feeding after their spring bloom in early summer.
Planting Rhizomes
Your Presby Irises
Rhizomes should be planted as soon as you receive them or stored in a cool, dry, well-ventilated place. Don’t wrap rhizomes in plastic or close them off from the air as this encourages disease. The first spring after planting, you can expect 30% of the plants to bloom. The second year you can expect 60% to bloom. The more sun they receive (6 – 8 hours daily), the greater the chances of excellent bloom.
When to Plant
For best results, irises should be planted in July, August or September. It’s imperative that the roots of newly planted irises be well-established before the growing season ends. In areas with hot summers and mild winters, September or October planting may be preferred. Potted irises can be planted any time before the fall.
Where to Plant
Irises prefer full sun, but will grow and bloom well if given 6 hours of sunlight. The bearded irises will not tolerate wet feet; providing good drainage will avoid many problems. Irises will grow in any good garden soil.
Soil Preparation and Fertilizing
Before planting a new bed of irises, dig in plant food and cultivate well. A balanced fertilizer such as 5-10-10 can be dug lightly into the soil. This should be done three weeks before the plants are set in. A large quantity of well-rotted compost is a good addition and should be incorporated into the upper 6 – 8 inches of soil before planting. Soil pH should be near neutral between 6.1 and 7.2.
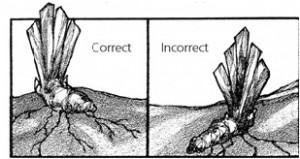
Depth to Plant
When ready to plant, dig a shallow hole, leaving a dividing ridge in the center. Place rhizomes directly over the center of the ridge and spread the feeding roots to either side so the plant is securely anchored.
Irises should be planted close to the surface of the soil. A common mistake is to plant irises too deeply. Pull soil towards plant from either side by pressing on top of the roots. The rhizome should be planted just barely beneath the soil and covered with no more than 1/2″ inch of soil. Water well.
Distance Apart
Irises are generally planted 12 to 24 inches apart. Closer planting gives a fuller effect, but closely planted irises will need to be thinned more frequently.
Watering
New plants require watering to set their roots. Once the new root system is established, iris require very little watering unless conditions are very arid.
How to Divide Irises
Every 3 or 4 years in July or August, and no later than Labor Day, old clumps should be dug up and divided. Rhizomes may be divided by hand. Any rhizome rot must be cut off until the rhizome is firm and white like a potato. The old center or mother rhizomes that have already bloomed may be discarded. Replant the new fans or “toes”. Trim leaves to an inverted V shape and cut back roots to 4-6 inches. For more detailed information, please view our youtube video.
Pests & Diseases
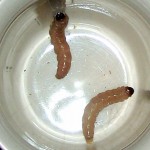
The Dreaded Iris Borer
Adult brown moths emerge from the soil in August and September, mate, and lay eggs on spent iris leaves or garden debris. The eggs overwinter in the debris. As temperatures reach 70 degrees in April or May the larvae hatch and crawl up onto the new iris leaves. Entering the foliage, the larvae eat their way to the base of the leaves throughout the spring. By early to mid-July the larvae reach the soil area and tunnel into the rhizomes. In the rhizome, the borer causes a great deal of damage as it continues to eat. In late July to early August, the borers move from the rhizomes into the soil to pupate for 2 -3 weeks. Pupae are dark brown to black and are usually found in the top 2 inches of soil. The moths emerge in late August and September to mate, lay eggs, and repeat the cycle. For control, sanitation is critical. In the fall, remove all spent leaves and clean area of any garden debris. In the spring, vertical streaks on the leaves and notching reveal the larvae’s presence. If they are still in the leaves you can squish them there. If they reach the rhizome, you will have to dig it up and remove them by cutting away the damaged portion of the rhizome.
We have been very successful using nematodes to control iris borers. Watch our Youtube video on treating with nematodes at Presby.
Soft rot
Soft rot in rhizomes can be caused by borers, excess moisture, and/or incorrect planting (too deep). Scrape away all sign of rot and treat with a solution of 10% bleach/90% water or comet.
Leaf spot
Leaf spot is caused by excess moisture and presence of the pathogen. Cut back affected leaves and discard. Do not compost infected leaves.